Choosing the Right SwiftUI Property Wrapper for You
It’s been four years since SwiftUI appeared in the world of app development. Although it’s not yet fully mature, and UIKit is still a cut above in many contexts, Apple’s new UI framework has made great strides since its release.
Before starting: the SSoT principle
The basic premise of any declarative UI framework like SwiftUI is that the view is a reflection of a single source of truth.
The Single Source of Truth (SSoT) principle is a concept used to ensure that everyone in an organization bases business decisions on the same data. If we apply it to app development, SSoT is all about maintaining a single, authoritative source of data for your user interface. It ensures that the software we design is reliant on the correct and up-to-date information.
In the context of SwiftUI, the Single Source of Truth principle is particularly important for creating maintainable and predictable user interfaces. SwiftUI apps typically have a data flow that starts with your application’s data model that represents the current state of your application, including user data, preferences, and other relevant information. This data model is considered the single source of truth for your application’s data.
SwiftUI uses a declarative approach to build user interfaces, where you describe what your UI should look like based on the current state of your data. When the data in your single source of truth changes, SwiftUI automatically updates the UI to reflect these changes. This is known as reactivity.
To maintain a single source of truth, you should follow a uni-directional data flow pattern in your SwiftUI application. This means that data flows in one direction: from your Single Source of Truth to your UI. When users interact with the UI, these interactions should result in changes to the Single Source of Truth, which in turn triggers UI updates.
SwiftUI provides some tools called property wrappers like @State, @Binding, and @ObservedObject to create connections between your single source of truth and your UI. These allow you to keep the UI and data in sync, making it easier to maintain the single source of truth.
Property wrappers
Property wrappers are called so because they wrap or encapsulate a property, adding additional behavior or attributes to a property. The word “wrapper” implies that they surround or contain a property, modifying its characteristics or how it behaves without altering the property’s core definition.
A common use case for property wrappers in SwiftUI is to create properties that automatically trigger view updates when their values change. When you are new to SwiftUI, one of the questions that arises most spontaneously is:
Which property wrapper should I use for my data?
The answer (of course) is: it depends!

The property wrappers you must know to manage your data flow in SwiftUI are the following:
@State@Binding@StateObject(ObservableObject)@ObservedObject(ObservableObject)@EnvironmentObject
@State: the Soloist of SwiftUI
Solo state management for your view’s inner drama.
The @State property wrapper is used to store and manage the internal state of a view. It should be used when you want to store and manage some data belonging to one, and only one view.
Here’s an example:
struct ContentView: View {
    @State private var toggle: Bool = false

    var body: some View {
        VStack {
            Toggle("Show message", isOn: $toggle)

            if toggle {
                Text("Hello, User!")
            }
        }
    }

}
The Boolean property toggle represents the local state of the ContentView and therefore its single source of truth. Since we talk about local state, when you use the @State property wrapper it’s important to mark the property as private so that it’s not accessible from outside.
@Binding: the Data Synchronization Guru
Binding is like the relationship counselor, because two views should talk and not just ghost each other.
The @Binding property wrapper allows you to share a property between different views, usually in a context of parent-child views. Let’s take our previous example and suppose we want to build a custom toggle wrapping the default toggle of SwiftUI.
struct CustomToggle: View {
    @Binding var isOn: Bool

    var body: some View {
        Toggle("Show message", isOn: $isOn)
         .foregroundColor(isOn ? .blue : .gray)
         .padding(10)
         // Any other customization ...
    }
}

struct ContentView: View {
    @State private var toggle: Bool = false

    var body: some View {
        VStack {
            CustomToggle(isOn: $toggle)

            if toggle {
                Text("Hello, User!")
            }
        }
    }
}
In this case, the single source of truth remains the toggle property in the parent ContentView view. Using the @Binding wrapper, a binding to that property is passed to the CustomToggle child view which can access and modify it. Changes made by the child view will automatically be reflected in the parent view.
@StateObject: The Persistent Data Defender
StateObject is your SwiftUI app’s very own memory hoarder.
Now let’s complicate things a little. Suppose we want to be good programmers and structure our app better. We want to use the MVVM pattern to separate the model and the view. First thing first, let’s create our view model.
class ContentViewModel: ObservableObject {
    @Published var toggle: Bool = false
}
There are two important things to note here:
- the
ContentViewModelclass conforms to theObservableObjectprotocol, which is used to create an object that can be observed for changes in its properties; - the
toggleproperty is no longer marked with@Stateor@Binding, but with@Publishedwhich is the property wrapper for properties inside an Observable Object.
Now: Where do we initialize our class? And which property wrapper do we use? We use @StateObject:
struct ContentView: View {
    @StateObject private var viewModel = ContentViewModel()

    var body: some View {
        VStack {
            CustomToggle(isOn: $viewModel.toggle)

            if toggle {
                Text("Hello, User!")
            }
        }
    }
}
The @StateObject property wrapper is used to declare and manage a property that represents an instance of a reference type (i.e., a class) as a source of truth for a view's state. This is particularly useful when you need to manage the state of an object that should persist across view updates and changes in the view hierarchy.
In the example, the viewModel object is instantiated when the ContentView view is loaded and persists throughout its entire lifecycle.
@ObservedObject: The Real-Time Data Watcher
Because every view deserves a personal stalker.
We used the @StateObject wrapper to initialize and manage the ViewModel of our view. But now what happens in the CustomToggle? How can it interact with the toggle property found in the ContentViewModel?
We use @ObservedObject:
struct ContentView: View {
    @StateObject private var viewModel = ContentViewModel()

    var body: some View {
        VStack {
            CustomToggle(viewModel: self.viewModel)

            if viewModel.toggle {
                Text("Hello, User!")
            }
        }
    }
}

struct CustomToggle: View {
    @ObservedObject var viewModel: ContentViewModel

    var body: some View {
        Toggle("Show message", isOn: $viewModel.toggle)
           .foregroundColor(viewModel.toggle ? .blue : .gray)
           .padding(10)
           // Any other customization ...
    }
}
The @ObservedObject property wrapper is used to create a connection between a SwiftUI view and an external object that conforms to the ObservableObject protocol. This connection allows the view to automatically update and re-render whenever the observed object's properties change.
In this way, the CustomToggle view can make changes to the toggle property of the ViewModel which will then be reflected in the ContentView.
@EnvironmentObject: The App-Wide Data Dispatcher
First rule of the environment: what happens in the environment, stays in the environment.
Finally: suppose we have a class called UserData that needs to be accessible throughout the entire application. According to what we have said so far, the most instinctive and logical thing to do is to initialize the object in the application root (the App class) using the @StateObject wrapper, and then pass it to all the various child views.
However, passing an ObservableObject through the entire view hierarchy becomes very tedious and complicated, especially if the number of sub-views grows. The solution is @EnvironmentObject.
@EnvironmentObject is a property wrapper that allows you to share and access data across different views within your app. It's used to pass data objects between views without the need for manually passing them through each view's initializer.
class UserData: ObservableObject {
    @Published var username = "JohnDoe"
}

struct ContentView: View {
    @EnvironmentObject var userData: UserData

    var body: some View {
        Text("Hello, \(userData.username)!")
    }
}

@main
struct MyApp: App {
    @StateObject private var userData = UserData()

    var body: some Scene {
        WindowGroup {
            ContentView()
                .environmentObject(userData)
        }
    }
}
Answers to some spontaneous questions
Since they both work with ObservableObject, what’s the difference between @StateObject and @ObservedObject?
@StateObjectis primarily used to create and manage a single instance of an observable object within a view. It ensures that the object is created only once and persists as long as the view exists. It's particularly useful when a view needs exclusive control over a specific instance of an observable object, and you want to guarantee the object's existence for the view's entire lifecycle. Changes to the observed object's properties trigger view updates as well.@ObservedObject, on the other hand, is used to observe changes in an observable object within a view, but it does not manage the object's lifecycle. You typically use@ObservedObjectwhen you need to pass an existing instance of an observable object to a view, which is created and managed outside the view's scope (i.e., in another view). This is useful when multiple views should share the same instance of an observable object, and you have an external mechanism to create and manage the object. Changes to the observed object's properties also trigger view updates.
In essence, @StateObject ensures exclusive control and lifecycle management of an observable object within a view, while @ObservedObject is used to observe changes in an externally managed observable object passed to the view.
Since they seem to do the exact same thing, what’s the difference between @Binding and @ObservedObject?
@Bindingis primarily used to establish a bidirectional binding between a parent view and a child view, allowing the child view to modify a state variable of the parent view and reflect the changes. This is useful when you want to pass data from one view to another and enable direct changes to the shared variable.@ObservedObjectis used to monitor changes to an observable object (an object that conforms to theObservableObjectprotocol) and update a view when such changes occur. It's useful when you want to maintain shared state between multiple views and ensure that any modifications to the observed object are reflected in all views observing it.
While both annotations may seem similar in the sense that they allow you to manage state and reflect changes in a view, the fundamental difference is that @Binding focuses on direct communication between views, enabling them to influence each other's state, whereas @ObservedObject is designed for managing shared observable objects that can be observed by multiple views without the need for direct communication between them.
@EnvironmentObject is so cool and easy to use! What about using it all the time?
While @EnvironmentObject is a powerful and convenient tool for sharing data across views in SwiftUI, the temptation to use it in any case is not our friend. Like any other wrapper, @EnvironmentObject has its use cases.

- Limited Data Sharing: If your data is only needed within a single view or a few closely related views, using
@Stateor@Bindingmight be simpler and more appropriate. - Complex Data Dependencies: If the data you’re sharing has complex dependencies and you need fine-grained control over updates and data loading, it might be more appropriate to use a combination of
@StateObjectand@ObservedObjector fetch data on-demand rather than relying on an environment object. - Read-Only Data: If your data is read-only and doesn’t change frequently, you might not need the reactivity that
@EnvironmentObjectprovides. You can use a simple@Stateproperty to initialize and display this kind of data. - Clarity and Modularity: overusing
@EnvironmentObjectcan lead to a lack of clarity in your code and make it harder to understand the data flow within your app. In some cases, it's better to pass data explicitly to make the code more self-contained and modular. - Performance Considerations: while SwiftUI is highly optimized for performance, using too many environment objects can potentially impact performance. If you’re dealing with a large number of environment objects or frequent updates, it’s important to consider performance implications and use
@State,@Binding, or other data-sharing mechanisms where appropriate.
In general, the choice of whether or not to use @EnvironmentObject should be based on the specific needs of your app and the organization of your data. It's a valuable tool for managing shared data, but it's important to use it judiciously to maintain a clear and efficient code structure.
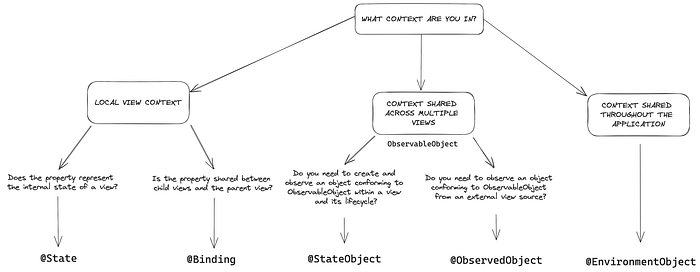
Choosing your wrapper
To conclude, I made this simple mind map to help you choose the right property wrapper.